
默认情况下,WSL 使用基于 NAT 的体系结构。
WSL 2.0.5 版本后建议尝试新的镜像网络模式以获得最新的功能和改进。
如果您正在使用该版本可以参照官方文档配置,在 C:\Users<UserName>.wslconfig 文件中 (如果不存在就手动创建一个) 加入以下内容开启镜像网络模式:
[wsl2]
networkingMode=mirrored
如此配置之后,无需查看后文内容。
如果你本来就配置好了网络代理,但是在 WSL 升级后无法访问,可查看后文的提示。
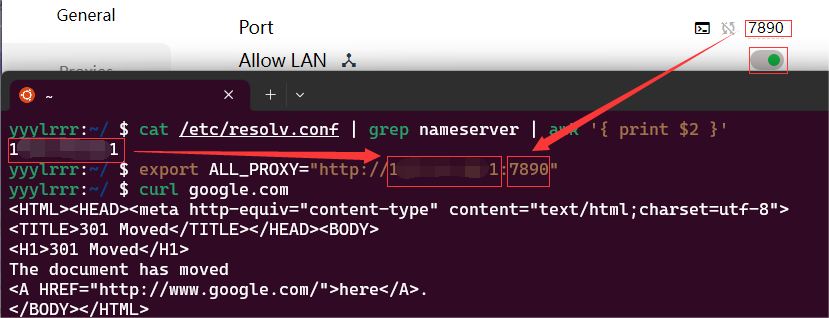
由于 WSL2 是使用 Hyper-V 虚拟机实现的,所以 WSL2 可以通过本机暴露的 ip 地址加上端口号设置代理。WSL2 会把 ip 写在 /etc/resolv.conf 中, 因此可以用 cat /etc/resolv.conf | grep nameserver | awk '{ print $2 }' 这条指令获得宿主机 IP。打开 Clash 的 allow lan 功能并且查看代理端口,使用 export ALL_PROXY="http://$host_ip:port 指令即可成功使用 Clash 网络代理。最后利用 curl google.com 指令验证 WSL2 是否成功访问网络代理,如果有结果即访问代理成功。
如果访问网络代理只是极偶尔的需求,本文以上内容应该就足以使用了。但是我在实际使用中,会频繁使用 git 同步代码,并且由于我在使用 pnpm 管理 node 环境的时候,网络经常访问不了 nodejs.org,即难以管理 nodejs 版本,故而在进一步查询相关资料后,得到以下解决方案。
通过 shell 脚本启动代理,这种配置方法不仅使用简单且适用于长期配置1,具体步骤如下:
新建 ~/scripts/proxy.sh,并在该脚本文件中复制以下代码:
#!/bin/sh
hostip=$(cat /etc/resolv.conf | grep nameserver | awk '{ print $2 }')
wslip=$(hostname -I | awk '{print $1}')
port=7890

PROXY_HTTP="http://${hostip}:${port}"

set_proxy(){
  export http_proxy="${PROXY_HTTP}"
  export HTTP_PROXY="${PROXY_HTTP}"

  export https_proxy="${PROXY_HTTP}"
  export HTTPS_proxy="${PROXY_HTTP}"

  export ALL_PROXY="${PROXY_SOCKS5}"
  export all_proxy=${PROXY_SOCKS5}

  git config --global http.https://github.com.proxy ${PROXY_HTTP}
  git config --global https.https://github.com.proxy ${PROXY_HTTP}

  echo "Proxy has been opened."
}

unset_proxy(){
  unset http_proxy
  unset HTTP_PROXY
  unset https_proxy
  unset HTTPS_PROXY
  unset ALL_PROXY
  unset all_proxy
  git config --global --unset http.https://github.com.proxy
  git config --global --unset https.https://github.com.proxy

  echo "Proxy has been closed."
}

test_setting(){
  echo "Host IP:" ${hostip}
  echo "WSL IP:" ${wslip}
  echo "Try to connect to Google..."
  resp=$(curl -I -s --connect-timeout 5 -m 5 -w "%{http_code}" -o /dev/null www.google.com)
  if [ ${resp} = 200 ]; then
    echo "Proxy setup succeeded!"
  else
    echo "Proxy setup failed!"
  fi
}

if [ "$1" = "set" ]
then
  set_proxy

elif [ "$1" = "unset" ]
then
  unset_proxy

elif [ "$1" = "test" ]
then
  test_setting
else
  echo "Unsupported arguments."
fi
注意如果修改了 Clash 的默认代理端口,需要将脚本第四行代码同步更改为你修改的端口。
可以通过如下命令控制及查看代理状态:
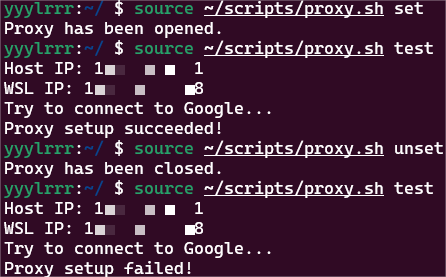
开启代理: source ~/scripts/proxy.sh set
关闭代理: source ~/scripts/proxy.sh unset
查看代理状态: source ~/scripts/proxy.sh test
WSL 2.2.1 版本默认启用了 DNS 隧道, 会导致以上方法失效。
如果您正在使用该版本可以参照官方文档配置,在 C:\Users<UserName>.wslconfig 文件中 (如果不存在就手动创建一个) 加入以下内容以关闭 DNS 隧道:
[wsl2]
dnsTunneling=false
alias 命令在 Linux 中经常使用,可以使在 Linux 命令行上的工作更加顺畅,由于我用的 shell 是 zsh,所以我在 ~/.zshrc 中加上 alias proxy="source ~/scripts/proxy.sh" 后即可运行 alias 命令在任意位置简单访问网络代理。
alias 命令如下:
开启代理: proxy set
关闭代理: proxy unset
查看代理状态: proxy test
如果再执行上述步骤后存在问题,可尝试检查以下内容:

1. 检查 Clash 中是否打开了 Allow Lan。
2. 检查 Clash 代理端口是否是 7890。
3. 检查 Windows 防火墙是否允许 Clash 在所有网络上访问。
4. 必要时可以关闭 WSL2 环境重新打开试试。

顺带一提,如果需要使用 Clash 代理 Windows 端的 git 时,应当使用以下命令:
  git config --global http.https://github.com.proxy http://127.0.0.1:7890
  git config --global https.https://github.com.proxy http://127.0.0.1:7890
取消代理的命令如下:
git config --global --unset http.https://github.com.proxy
git config --global --unset https.https://github.com.proxy
总之,祝愿大家在开发的过程中不会被网络及代码同步的问题所困扰。